
Wood Burning Stoves For Caravans
Wood burning stoves for caravans offer a cozy and efficient heating solution, transforming a simple travel vehicle into a warm and inviting home on wheels. This guide will explore the best wood burning stoves for caravans, highlighting models that combine functionality, safety, and aesthetic appeal. Additionally, we’ll provide a comprehensive installation guide, ensuring that you can enjoy the comfort and charm of a wood burning stove safely and effectively during your travels.

Embracing the Charm: Wood Burning Stoves for Caravans
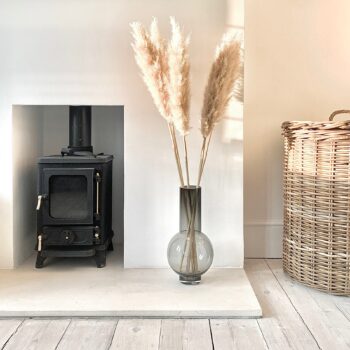
There’s something undeniably enchanting about a wood burning stove. The crackling logs, the dancing flames, and the gentle warmth create a cozy atmosphere that transforms any space into a welcoming haven. For caravan enthusiasts, installing a wood burning stove is the perfect way to bring this charm on the road, making your mobile home feel even more like a snug retreat. In this post, we’ll explore the benefits of having a wood burning stove in your caravan, tips for choosing the right one, and essential installation advice to ensure safety and efficiency.
The Cozy Benefits of Wood Burning Stoves
A wood burning stove offers a multitude of advantages for caravan owners. First and foremost, it provides efficient and reliable heat. Unlike electric or propane heaters, wood stoves can generate significant warmth, making them ideal for colder climates or extended trips during the cooler months. The radiant heat from a wood stove not only warms the air but also creates a pleasant, uniform temperature throughout the caravan.
Moreover, the ambiance created by a wood burning stove is unparalleled. The soft glow and the sound of crackling wood can make even the most ordinary evening feel special. It’s perfect for those moments when you want to unwind with a book, enjoy a hot beverage, or simply sit back and relax after a day of adventure.

Choosing the Perfect Caravan Wood Burner
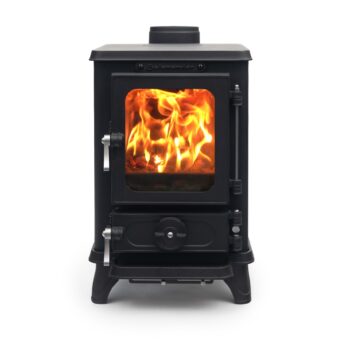
When it comes to selecting a wood burning stove for your caravan, size and efficiency are key factors. You’ll want a stove that is compact enough to fit comfortably in your limited space but powerful enough to heat your entire living area. Look for models specifically designed for small spaces; these stoves are often more efficient and easier to install in caravans.
Safety features are another crucial consideration. Ensure the stove you choose has proper ventilation options and safety certifications. Many modern wood burning stoves come with features like airwash systems to keep the glass clean, secondary burn for improved efficiency, and cool-touch handles for added safety.
Installation Essentials
Installing a wood burning stove in a caravan requires careful planning and attention to detail. Here are some essential steps to ensure a safe and successful installation:
-
Location: Choose a location that allows for safe clearance from walls and other combustible materials. Ensure there is adequate space for proper ventilation.
-
Ventilation: Proper ventilation is crucial. Install a flue or chimney system that safely directs smoke and gases out of the caravan. Double-check seals and joints to prevent leaks.
-
Heat Shields: Use heat-resistant materials around the stove area to protect your caravan’s interior. Heat shields can be installed on walls and floors to prevent heat damage.
-
Secure Positioning: Ensure the stove is securely fastened to prevent movement while driving. This may involve bolting the stove to the floor or using specialized brackets.
-
Regular Maintenance: Keep your stove in top condition with regular maintenance. Clean the flue, check seals, and inspect for any signs of wear or damage.

Finding the Perfect Logs and Lighting Your Log Burner in a Caravan with a Hot Box Firestarter
Having a log burner in your caravan is a fantastic way to enjoy warmth and ambiance on the go. However, to make the most of your log burner, choosing the right wood logs and using an efficient method to light them is crucial. In this blog post, we’ll explore the best wood logs for your caravan log burner and how a hot box firestarter can make the lighting process quick and hassle-free.
The Best Wood Logs for Your Caravan Log Burner
When selecting wood logs for your log burner in a caravan, it’s essential to consider the type of wood, its moisture content, and its burning properties. Here are some of the best options:
-
Hardwoods: Hardwoods like oak, ash, and beech are excellent choices for log burners. They burn slowly and produce a high heat output, making them ideal for heating your caravan efficiently. Hardwoods also leave less residue, reducing the frequency of cleaning your stove and flue.
-
Kiln-Dried Logs: These logs have been dried in a kiln to reduce their moisture content to below 20%. Lower moisture content means they ignite easily, burn hotter, and produce less smoke. Kiln-dried logs are perfect for use in a log burner, ensuring a clean and efficient burn.
-
Seasoned Logs: Seasoned logs are naturally dried over a period of time, typically 1-2 years. They should have a moisture content of 20-25%. While not as dry as kiln-dried logs, well-seasoned logs are still a good option if properly stored.
-
Softwoods: Softwoods like pine and spruce can be used but are generally less efficient than hardwoods. They burn faster and produce more creosote, which can lead to increased maintenance. However, softwoods can be useful for kindling and starting fires due to their quick ignition properties.
Using a Hot Box Firestarter
Lighting a log burner in a caravan can sometimes be challenging, especially in damp or windy conditions. A hot box firestarter is an excellent tool to make the process easier and more reliable. Here’s how to use one effectively:
-
Prepare the Firebox: Before you start, clean out any ash from the previous fire to ensure proper airflow. Place a layer of kindling at the bottom of the firebox.
-
Place the Hot Box Firestarter: Position the hot box firestarter in the center of the kindling. Hot box firestarters are designed to ignite quickly and burn at a high temperature, making them perfect for lighting your log burner.
-
Arrange the Logs: Stack your chosen wood logs around the firestarter. Ensure there is enough space for air to circulate, as this will help the fire catch and burn efficiently. Start with smaller logs or additional kindling, and add larger logs once the fire is established.
-
Ignite the Firestarter: Light the hot box firestarter according to the manufacturer’s instructions. Most firestarters will begin to burn rapidly, igniting the kindling and logs around them.
-
Maintain the Fire: Once the fire is going, adjust the air vents on your log burner to control the airflow and maintain a steady burn. Add more logs as needed to keep the fire burning consistently.
Enjoying the Warmth and Comfort
With the right wood logs and the help of a hot box firestarter, lighting your log burner in a caravan becomes a straightforward task. The combination of efficient, high-quality logs and a reliable firestarter ensures you can quickly create a warm, cozy atmosphere inside your caravan, no matter the weather outside. So, stock up on the best logs, grab a hot box firestarter, and enjoy the delightful warmth and charm of your log burner during your travels.
Guide to Installing a Wood Burning Stove in a Caravan Using Twin Wall Flue System
Installing a wood burning stove in your caravan can significantly enhance your mobile living experience by providing warmth and a cozy ambiance. However, safety is paramount, and using a twin wall flue system ensures proper insulation and prevents heat transfer to the caravan’s structure. This guide will walk you through the steps to install a wood burning stove in your caravan using a twin wall flue system.
Materials and Tools Needed
- Wood burning stove (suitable for small spaces)
- Twin wall flue system (including flue pipe, wall brackets, and roof flashing)
- Heat-resistant boards (for hearth and wall protection)
- Fire-resistant sealant
- Carbon monoxide detector
- Screws, bolts, and brackets
- Power drill and drill bits
- Jigsaw or hole saw
- Measuring tape
- Safety gear (gloves, safety glasses)
Step-by-Step Installation Guide
-
Choose the Stove Location
Select a suitable location for your stove, ensuring there is enough clearance from walls, furniture, and other combustible materials. The location should allow for proper flue routing and adequate ventilation. Consider placing the stove near an external wall to simplify flue installation.
-
Prepare the Area
Install heat-resistant boards on the floor (hearth) and walls around the stove location to protect your caravan’s interior from heat. Ensure the hearth extends beyond the stove’s footprint to catch any falling embers. Secure the boards with screws and fire-resistant sealant.
-
Mark the Flue Exit Point
Using a measuring tape, mark the flue exit point on the ceiling and roof. Ensure the flue will run straight from the stove to the roof without any obstructions. The exit point should be directly above the stove for optimal performance.
-
Cut the Flue Hole
Wearing safety gear, use a jigsaw or hole saw to cut a hole in the ceiling and roof at the marked exit point. The hole should be slightly larger than the diameter of the twin wall flue pipe to allow for adjustments and insulation.
-
Install the First Flue Section
Attach the first section of the twin wall flue pipe to the stove’s flue collar. Secure it tightly with screws and seal any gaps with fire-resistant sealant. Ensure the pipe is vertical and properly aligned with the exit hole.
-
Assemble the Twin Wall Flue System
Continue assembling the twin wall flue system, adding sections of flue pipe as needed. Use wall brackets to secure the flue pipe to the caravan’s wall at regular intervals, maintaining stability. Ensure each flue section is tightly connected and sealed.
-
Install Roof Flashing
Position the roof flashing around the flue pipe on the roof. Secure it with screws and sealant to prevent water ingress. Ensure the flashing is properly aligned and provides a watertight seal.
-
Install the Flue Cap
Attach the flue cap or chimney pot to the top of the flue pipe. The flue cap prevents rain, debris, and animals from entering the flue, ensuring proper airflow and safety.
-
Seal and Insulate
Seal any gaps around the flue pipe with fire-resistant sealant. Install insulation around the flue pipe, particularly where it passes through the ceiling and roof, to prevent heat transfer and maintain safety.
-
Final Checks and Safety Measures
Double-check all connections, seals, and clearances to ensure everything is secure and properly installed. Install a carbon monoxide detector in the caravan to monitor for any dangerous fumes.
- Test the Stove
Light a small fire in the stove to test the draft and check for any smoke leaks. Ensure the flue system is drawing properly and all seals are intact. Monitor the stove and flue during the initial burn to confirm everything is functioning correctly.
Safety Tips
- Always follow the manufacturer’s instructions for both the stove and the flue system.
- Regularly inspect and maintain your stove and flue system to ensure safe operation.
- Never leave the stove unattended while in use, especially in a small, enclosed space like a caravan.
- Store firewood in a dry place to ensure efficient and clean burning.
By following these steps, you can safely and effectively install a wood burning stove in your caravan using a twin wall flue system. Enjoy the warmth and comfort of your new stove, making your caravan a true home on wheels.
 Stoves
 Bio Ethanol Fires
 Beams
Beams Fireplace Surrounds
 Hearths
 Fireside Services
 Logs For Wood Burner
 Outdoor Living
 Instant Quote
 Contact Hot Box®