

Hot Box ® Stoves
Flexible flue liner
A flexible flue iiner should provide a seamless route for flue gasses and other bi prodiucts of combustion from appliance to atmosphere.
Frequently, they are used to connect wood burning and solid fuel stoves to existing masonry chimneys.
The additona of a flue liner has a number of benefits which include:
- Seamless duct for smoke flue gasses from stove to atmosphere.
- A clear, correctly sized exhaust which heats up and creates draw quickly.
- Ease of maintenance, all bi poducts of combusiton are contained with the liner, which can then be swept using an appropriately sized cleaning brush.
When measuring a flexible flue liner, you will need to consider a number of factors, as explained in some detail by this page.
However, the advice is simple, measure twice, cut once, get it right first time, mistakes can be expensive.
more about Chimney Lining
Measuring for a flue liner
How do I know what size liner I need?
A flexible flue liner should be sized according to the flue outlet of the appliance.
- A 5″ or 125mm flue outlet will require a 125mm or 5″ flexible flue liner.
- The diameter of a liner can be stepped up, so a 5″ flue outlet could be connected to a larger diameter liner, but not reduced. I.e, a 6″ fle outlet cannot be connected to a 5″ flexible flue liner.
- Size the liner to the flue outlet of your stove.
You can check the manufacturers details for your stove using our brand page, which details all information relating to a range of wood burning appliances..
What is the diameter of a chimney liner?
Chimney liners come in a range of diamters. When using solid fuels, your flue liner should be a minimum of 125mm or 5″.
Here are the diameters of flue liner available from Hot Box ®.
- 4″ or 100mm flexible flue liners. Suitable for air ducts, some gas appliances or extraction but not solid fuel applications.
- 5″ or 125mm flexibkle fliue liners. Suitable for a range of wood burning appliances with a 5″ or 125mm flue outlet. Appliances such as the popula Parkray Aspect wood burner have a 125mm flue outlet and would therefore be suited to the use of a 125mm flexible flue liner.
- 6″ or 150mm flexible flue liners. Suitable for a range of wood burning appliances and ducting applications, a 150mm flexible flue liner is a good choice for solid fuel stove installation appliactions. However, you should carefully consider the diameter of your existing flue when using a 6″ liner to ensure that it will fit. a test can be carried out using a core ball method.
- 7″ or 180mm flexible flue liners. For larger wood burning appliances such as some Stuv Models, a 7″ flexible flue liner is not used often and needs to be carefully considered when used to re line an existing masonry chimney.
- 8″ or 200mm flexible flue liners. Frequently used to re line existing chimneys to serve an open appliance or larger wood burner such as certain models from Spartherm for example. A 200mm diameter flexi flue liner is seldom used and will be difficult to instal inside common fireplace flues.
Measuring your flexible flue liner | The Hot Box ® Method
Before we delve into how to measure for your flexible flue liner, we must reiterete that having a little bit of waste is no bad thing. Joining a flue liner to create additional length is not good practice.
- Measure the ceiling height in the room where the appliance is to be installed. +300mm for ceiling or floor joists above.
- Measure the ceiling height in the room above, +300mm for ceiling joists.
- Measure the height to the apex of your loft space or room, +300mm for roof rafters, battens and covering.
- Measure the hight of your chimney, a brick is 75mm as a rule and a mortar joint is 5mm. Therefore, 15 courses of bricks would = 15 course x 80mm =1200mm.
- Measure your chimney pot, common pot sizes are 300mm, 600mm, or 900mm. You may need to estimate this if safe access is not available.
Flue liner measurements theory
Using the above method you will end up with the following measurements, which will be appropriate to your spcific property.
- 2500mm + 300mm = 2800mm.
- 2400mm + 300mm = 2700mm.
- 2600mm + 300mm = 2900mm.
- 15 courses x 80mm = 1200mm.
- a 600mm chimney pot = 600mm.
Totals therefore 10,200mm or 10.2m.
Now, consider bends in the flue and a small contingent for waste:
10.2m + 20% = 10.2 + 2.04 =12.24m. Round this up, not down and buy 13m of the correct diamter flue liner for your application.
Shop flexible flue liners
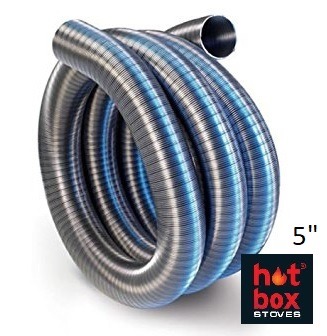
5″ flexible flue liners
Suitable for wood burners with a 4″ or 5″ flue outlet. Metrically speaking, 125mm.

6″ flexible flue liners
Suitable for appliances with a 5″ or 6″ flue outlet, 150mm in metric terms.

7″ flexible flue liners
Suitable for appliances with a 150mm or 180mm flue outlet. 7″ in imperial terms.
What else do I need for a flexible flue liner?
Once you have measured your flexible flue liner, and are happy that you have ordered the correct length base on our guide, it is time to consider what else you will need.
Critically, your flexible flue liner should be installed the right way up, there are arrows to demark the direction of flue gasses from the appliance up the flue.
To fit your flexible flue liner, you will also need to consider:
Tools and equipment:
- Safe working access, compliance with The Working at Height Regulations is critical. View the guide.
- Long rope, suitable for dropping down the flue to direct the liner.
- Hacksaw or grinder to cut the liner to the precise size.
- Flat head screw driver.
- Duct tape (taping the nose cone to the liner)
PPE (personal protective equipment)
- Liners are sharp, wear gloves.
- Eye protection, when cutting the liner.
- Hearing protection if using power tools.

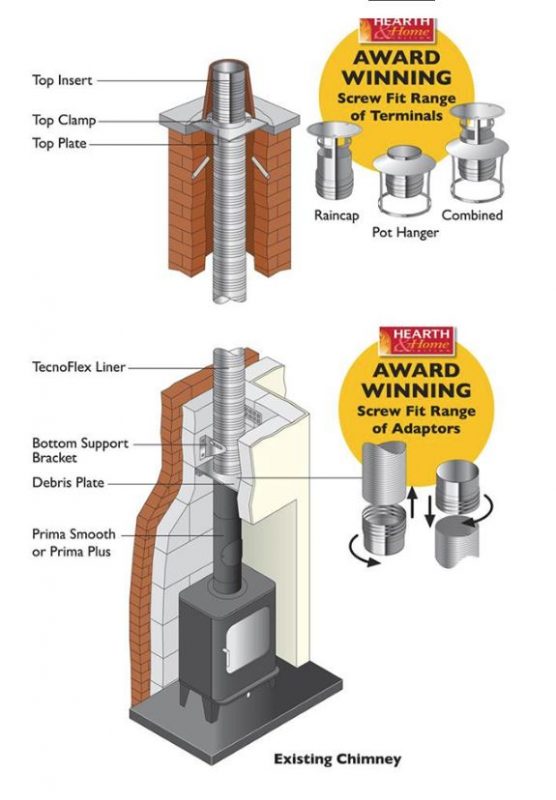
In addition to your flexible flue liner you will need, from the stove up…
- Nose cone, to help guide your liner down the flue.
- Stove pipe, 600mm vitreus enamel for example. Ignore the offers of a freebie as part of an installation bundle, they are not worth the metal that they are made from!
- Flexi to stove connector, a screw fit component that connects the flue liner to the stove pipe.
- Screw fit chimney cowl, to terminate the installation.
Alternatively, if you are replacing the chimney pot, you may want to use the following items to secure the flexible flue liner from the chimney.
- Galvanised top plate.
- Top clamp.
- Insert sleeve.
The process of fitting a flexible flue liner is detailed as follows:
Fitting a flexible flue liner is a common method used to improve the safety and efficiency of a chimney system, especially when retrofitting or upgrading existing flues. It’s particularly important for ensuring compliance with modern building regulations and safe venting for appliances like stoves, boilers, and open fires. In the UK, the installation of a flexible flue liner must adhere to relevant standards and regulations, such as those set out by Building Regulations Approved Document J, the HETAS (Heating Equipment Testing and Approval Scheme) guidelines, and the British Standards (BS EN 1856-2:2009 for flexible flue liners).
Here’s a step-by-step guide for fitting a flexible flue liner in the UK:
1. Assessment and Planning
- Chimney Inspection: The first step is to have the existing chimney or flue system thoroughly inspected. This should be done by a qualified chimney sweep or professional installer. The condition of the chimney must be assessed for structural integrity, obstructions, and moisture levels.
- Determine Size and Type of Liner: The size of the flexible flue liner must be appropriate for the appliance it will serve. The flue liner’s diameter should match the appliance manufacturer’s recommendations. Flexible flue liners come in various materials, such as stainless steel, and are often multi-layered for durability and heat resistance.
- Check Building Regulations and Approvals: Ensure that the installation complies with Building Regulations(especially Part J, which covers chimneys and flues) and any other relevant standards. You may also need to seek approval from your local building control department if required.
2. Preparation and Safety Measures
- Safety Equipment: Ensure that the installation area is clear and that safety equipment (such as gloves, goggles, and respiratory protection) is used, as the process can create dust and debris.
- Blockages and Cleaning: The chimney should be swept to remove soot, debris, or any obstructions that could hinder the installation process. This is crucial for ensuring the flue liner functions correctly.
- Seal Any Gaps: If the chimney has gaps or cracks in the brickwork, they should be sealed to prevent air and gas leakage. Any holes in the masonry should be patched up before installation.
3. Choosing the Correct Flexible Flue Liner
- Material Selection: For most installations, stainless steel is the preferred material due to its resistance to high temperatures and corrosion. Flexible flue liners are typically available in single- or twin-walled formats. Twin-walled liners are used when additional insulation is required.
- Liner Length and Type: The flexible flue liner should be long enough to run from the appliance to the top of the chimney stack. You may need to use extensions or adaptors depending on the specific setup.
- Insulation: Depending on the appliance and the type of chimney, insulation around the flue liner may be necessary for both safety and efficiency, particularly if the chimney is unlined or is located in a colder environment.
4. Installation of the Flexible Flue Liner
- Positioning the Liner: Begin by carefully feeding the flexible flue liner into the chimney from the top (chimney stack) or bottom (appliance). The method of installation will depend on the structure of the chimney and accessibility.
- Top-Down Installation: This is often the preferred method and involves lifting the flexible liner up to the top of the chimney, attaching it to a guide rope, and then carefully pulling it down into place.
- Bottom-Up Installation: In some cases, the liner may be inserted from the appliance side, especially if it’s not possible to access the chimney stack. Ensure that it is fed gently to avoid kinks or damage to the liner.
- Securing the Liner: Once the liner is in place, it should be secured to the appliance using an appropriate connector or collar. The connection between the flue liner and the appliance must be tight and secure to prevent leaks of flue gases.
- Top of the Liner: Once the liner is fully installed, ensure that it is secured at the top of the chimney stack. This may involve fitting a terminal or cowl to protect the liner from weather and debris. The terminal should be fitted securely and be compatible with the type of appliance being installed.
- Fixing the Liner: The flexible flue liner may need to be fixed to the chimney at various points using brackets or clamps to prevent movement and to ensure it remains secure during operation.
5. Testing the System
- Flue Integrity Test: Once the installation is complete, the system should be tested for leaks and proper function. This involves checking that the flue gases are venting correctly and that there is no escape of harmful gases into the home.
- Appliance Commissioning: The appliance should be fired up to ensure it is operating correctly with the new flue liner. This is also the point at which airflow and combustion efficiency should be checked.
- Smoke Test: A smoke test may be performed to ensure the flue is drawing properly and that there are no blockages or issues with the installation.
6. Finishing and Final Checks
- Sealing: Any gaps around the top of the chimney or at the appliance connection should be sealed with heat-resistant mortar or a similar material.
- Documentation and Certification: In the UK, the installation should be carried out by a certified installer who will provide a certificate of compliance with Building Regulations Part J and any relevant codes of practice. It’s important to keep this documentation for future reference, especially if you’re selling the property.
7. Maintenance and Ongoing Checks
- Chimney Sweeping: The flexible flue liner must be regularly maintained. It should be swept at least once a year to remove soot and creosote buildup, depending on usage. Some liners are easier to clean than others, so regular maintenance will help prolong the life of the liner and keep the system operating safely.
- Periodic Inspection: The liner and chimney should be inspected periodically to ensure no damage or wear has occurred over time.
Shop installation components
Hot Box ® Stoves
Flexible flue liners
How to measure a flexible flue liner has been explained in depth by this page. Details of the process have also been documented. If you are thinking of installing a flexible flue liner, then it is possible to do it yourself. However, Hot Box ® have been fitting flexible flue liners since 2008, and our free home survey is designed to ensure the correct measurements are taken and that the entire stove installation process is as smooth as possible.
Installing a flexible flue liner in the UK requires careful planning, adherence to regulations, and professional installation. The key steps involve assessing the chimney, choosing the right liner, preparing the chimney, installing the liner securely, and testing the system thoroughly. Regular maintenance and checks are also necessary to keep the system working efficiently and safely.
It’s highly recommended to hire a HETAS-registered installer to carry out this work, as they will ensure the installation meets all safety and legal requirements.
Book a survey
194 Fulford Road, York, North Yorkshire
YO10 4DD, United Kingdom
All rights reserved
Stack Modular Wood Stoves | National Installation by Hot Box ® Stoves
Stack Modular Wood Stoves – National Installation by Hot Box ® Stoves Stack modular wood[Read More...]
Wood Burner Buying Guide (Winter) | Hot Box ® Stoves Limited
Wood Burner Buying Guide (Winter 2026) | Hot Box ® Stoves Limited Hot Box ®[Read More...]

Spartherm Fireplaces for Modern Homes | Architectural Wood Fires by Hot Box ®
Spartherm are considered by many to be the Mercedes-Benz of wood-burning stoves. High quality components,[Read More...]
Ultimate Guide to Roof Penetrations & Flashings for Log Burner Flues
A definitive guide to planning, sizing, and installing roof penetrations and flashings for log-burner flues—materials,[Read More...]

The Ultimate Guide to Charnwood Stoves | Buy & Install with Hot Box ®
Thinking about investing in a Charnwood stove? Our Ultimate Guide covers everything you need to[Read More...]
Stove Buyer’s Checklist (Winter Edition)
A concise winter buyer’s checklist covering stove sizing, flue routes, Smoke Control, airtight home advice,[Read More...]
Lighting a Wood Burner: Step-by-Step Guide
Perfect your winter lighting routine—fuel prep, clean ignition with Firestarter, cold-flue tricks and air-control tips[Read More...]

Smoke Control Areas & Ecodesign Guide (UK)
Smoke Control Areas & Ecodesign: A Simple Winter Guide (UK) | Hot Box ® Blog[Read More...]
 Stoves
 Bio Ethanol Fires
 Beams
Beams Fireplace Surrounds
 Hearths
 Fireside Services
 Logs For Wood Burner
 Outdoor Living
 Instant Quote
 Contact Hot Box®